Definition: Cgk, i.e. Instrument Capability Index is a measurement system capability that evaluates non-personnel influences and is also the prerequisite for subsequent Cmk or even Cpk.
Cgk Application Scenarios:
1. Acceptance of new measuring equipment without human influence.
It is used to evaluate whether the performance of new equipment meets key performance testing requirements, such as testing equipment for automated production lines, or if products can be effectively positioned in the equipment without human impact.
2. Equipment operation without human influence.
Used to evaluate whether there is degradation in critical performance testing after transfer or overhaul.
3. General requirements and equipment GR&R evaluation methods are used together to evaluate measurement system.
After the Cgk is passed, the GR&R needs to be evaluated before the measurement system is considered passed.
Not applicable scenarios:
To release measurement systems with human influence, such as projectors.
Pure manual testing.
Cgk preliminary preparation and requirements:
1. People: It has nothing to do with personnel (it relates to fully automated equipment; semi-automated equipment needs to be evaluated).
2. Machine: similar to Cmk, in short, the equipment cannot be adjusted.
Fixed machine tooling and parameters such as speed.
Fixed support system hardware and parameters such as cooling water temperature, pressure and flow.
Equipment and tooling positioning, adjustment is prohibited (often referred to as fine-tuning).
3. Material: A semi-finished product is used as the reference part to be tested. Its requirements are as follows:
3.1. Select the workpiece to be measured that have the same characteristics as the actual measurement characteristics (no human intervention is allowed in its properties, such as pre-pressuring the product before measuring flatness).
3.2. Can be measured repeatedly without changing the measured property.
3.3. Near the tolerance center of the measurement value: Calibrate the reference value through calibration (calibration instrument has higher accuracy). If there is no calibration instrument, use an instrument with the same measurement conditions (also calibrated) to measure the part more than 10 times, and take the average value as "Basic Value" (Central Limit Theorem).
Note: If laboratory conditions allow, it is recommended to use laboratory instruments. If not, use station equipment.
4. Method: See operation guide.
5. Cycle: different from Cmk. The test of Cgk is required to be completed in a short period of time, and its ambient temperature, air pressure, humidity, electric field, magnetic field environment, etc. basically remain unchanged. Note: The stability of Cgk needs to be guaranteed. For example, if the measurement result is OK in the morning and NG at night, the conclusion is MSA NG. (General measurement systems or measurement equipment are only done once and some practices are contrary to the meaning of measurement system analysis.)
Cgk operation procedures:
1. Prepare the reference parts to be tested (the "materials" above-mentioned). A good start is half the success.
2. In actual measurement environment (for example, the production line equipment cannot be moved to the laboratory), use one device continuously measure the sample n ≥ 25 times (50 times are recommended).
Note: The equipment must not be adjusted (including "fine-tuning"). If there is an equipment abnormality, which in principle involves equipment adjustment or a change in the measurement environment, it needs to be redone; if there is only an abnormality such as a grating barrier, the alarm can be eliminated and the process can continue.
3. Record measurement results.
4. Input the measurement results into a form or software (usually Excel is enough) and calculate Cg/Cgk.
Cgk judgment criteria
Cgk>=1.33 (one time pass is rare)
Cgk< 1.33
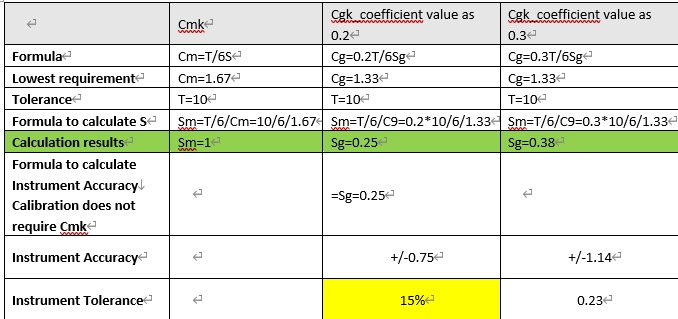
Relationship between Cmk and Cgk

The coefficient value here is 0.2, so it can be deduced that the accuracy of the measuring instrument needs to be at least 15% of the tolerance zone. This is why the accuracy selection of measuring instruments generally has a tolerance zone of 10%. And 6Sg refers to the range covered by the measuring instrument.